Giudica un uomo dalle sue domande, piuttosto che dalle sue risposte. — Voltaire1
Introduzione Link to heading
Jira Software permette ai team di pianificare, assegnare, monitorare e gestire il lavoro con più facilità.
Nasce nel 2002 inizialmente per il solo monitoraggio di bug e ticket, è scritto in Java, e il nome è un troncamento di Gojira, traslitterazione giapponese di Godzilla
In questo articolo, creeremo un’applicazione con la piattaforma di sviluppo Forge, per la raccolta e l’invio di dati ad un server esterno, tramite chiamata REST.
Il nostro plugin conterrà:
- una pagina di configurazione con i dati del server esterno
- funzioni che prelevano i dati da jira
- una form di dati aggiuntiva invio dei dati al server esterno
Il progetto è scaricabile per intero da qui
- Ci sono vari modi per installare le app Jira sul tuo ambiente.
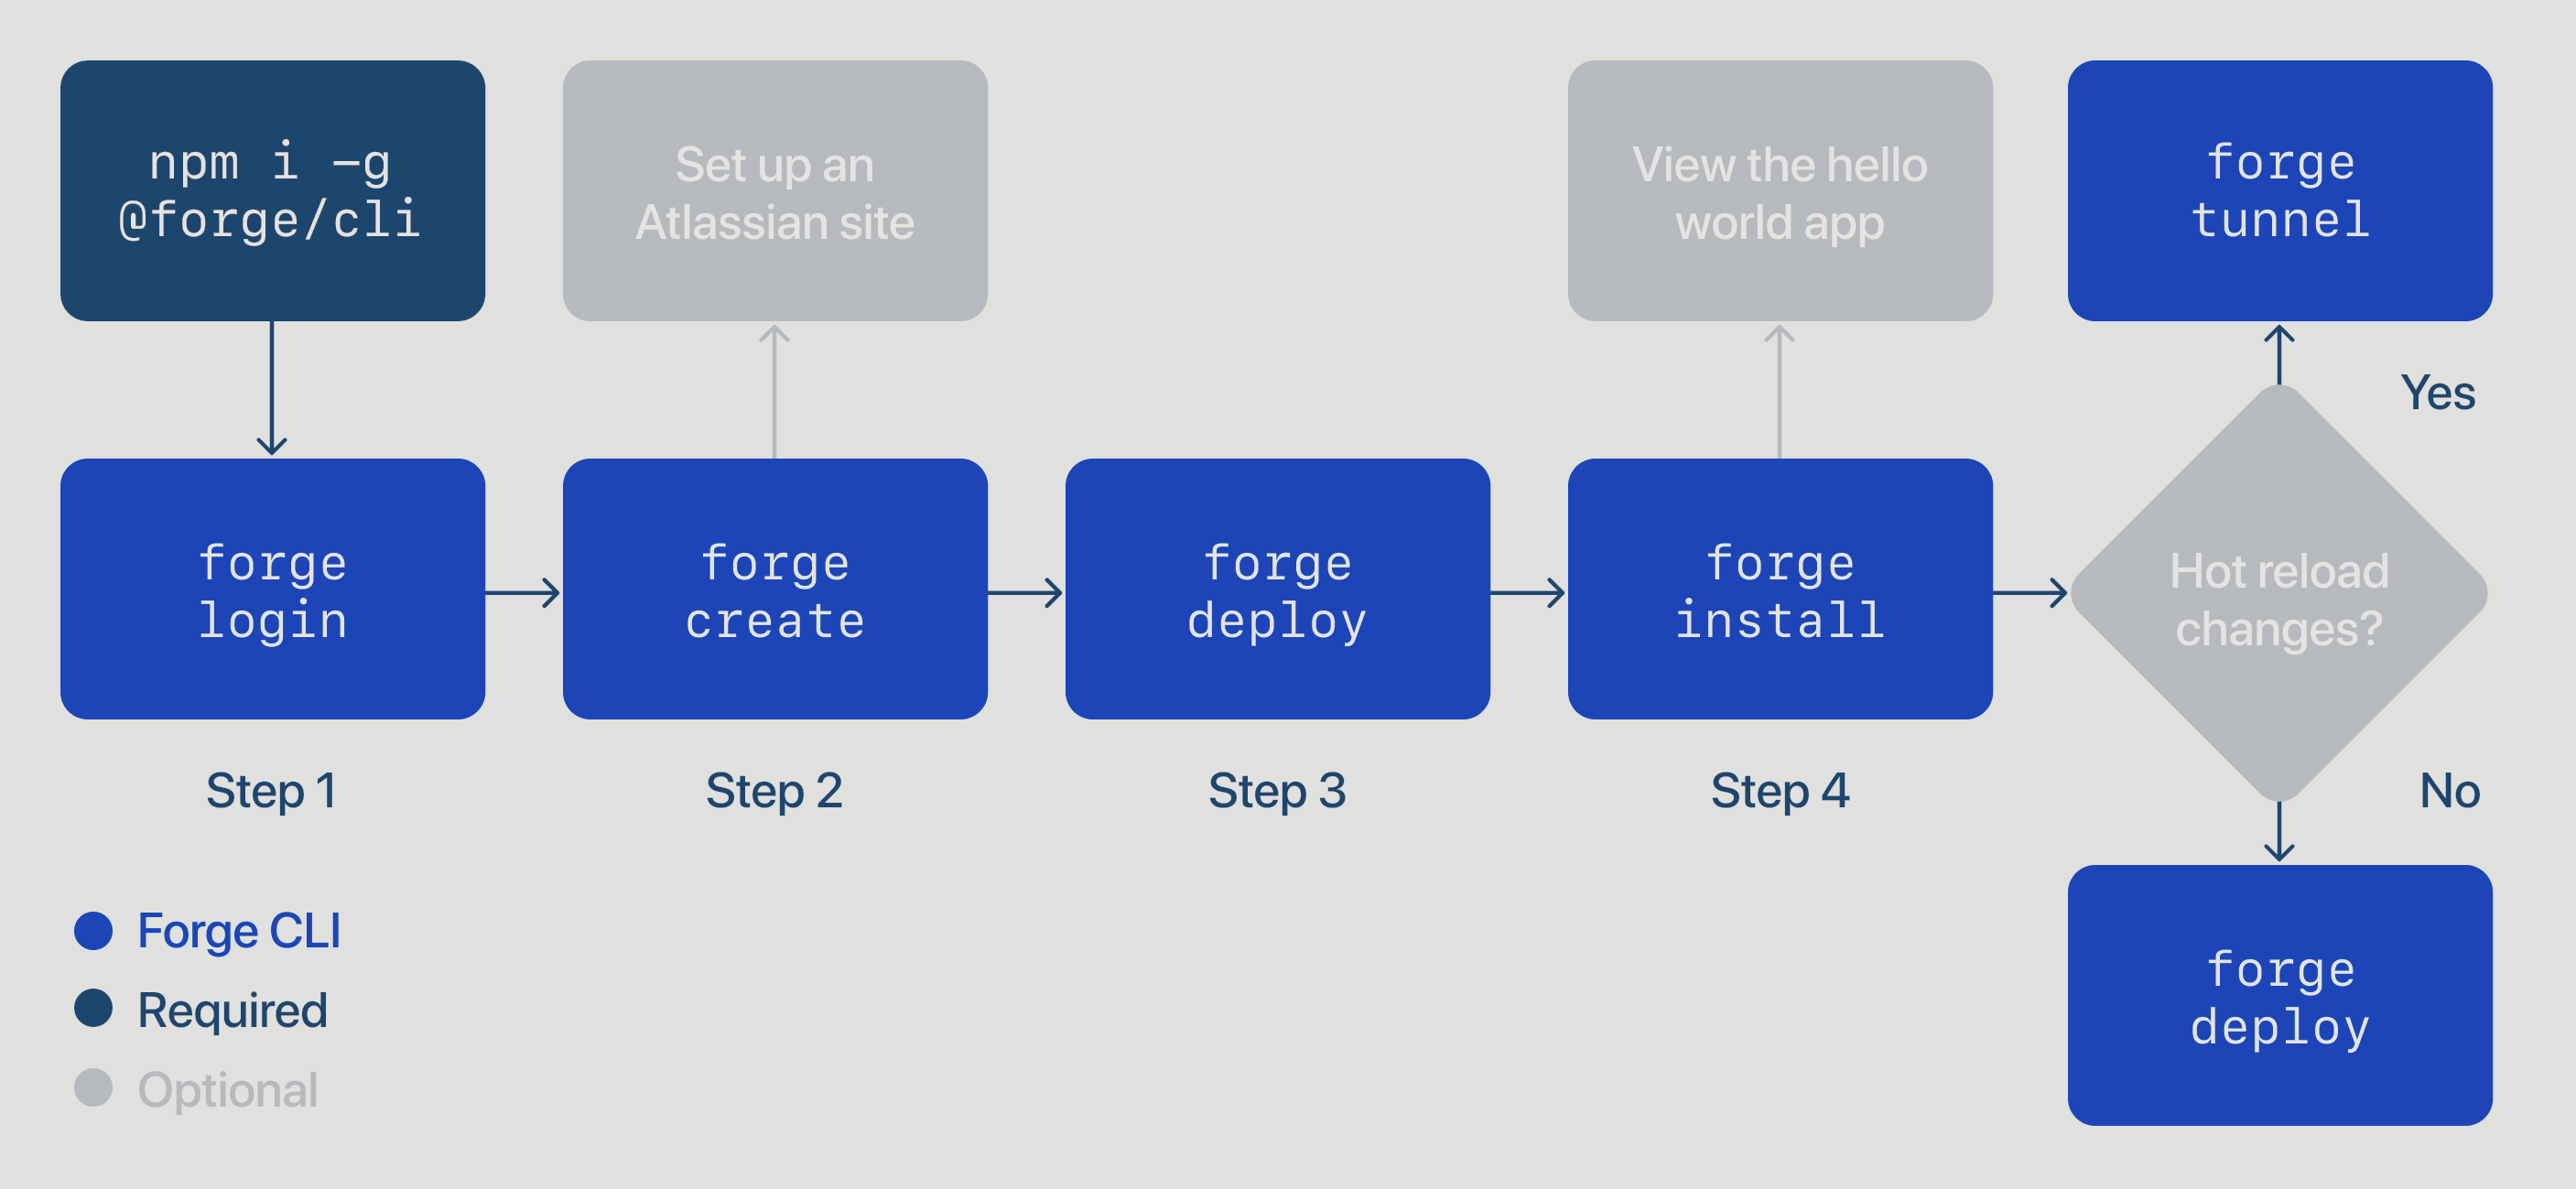
- Se preferisci scaricare il codice e pubblicare l’app dal tuo ambiente usa
npm installforge registerforge deploy
- Puoi monitorare le tue app e i logs nella sezione developer, accedi con il tuo utente, per sapere qual’è digita
forge whoami- I log delle applicazioni Jira, non saranno mai visibili nella console del browser.
Inizializzazione app Link to heading
- installa node e la cli di forge. GUIDA
- inizializza l’app. GUIDA
forge createscegliamo il template jira-admin-page-ui-kit- questa scelta non è vincolante, è solo la struttura files di partenza
- editiamo il file manifest.yml per aggiornare il nome dell’app e l’icona
modules:
  jira:adminPage:
    - key: testplugincb-hello-world-admin-page
      function: main
      title: Test Plugin CB
      label: Descrizione del tuo plugin
      icon: https://iCloudio.github.io/images/imgOnda.png
- Installiamo con
forge deployeforge installcome descritto QUI - Verifichiamo il risultato, dal sito, con la sezione “app” e poi “gestisci app”
Pagina di configurazione Link to heading
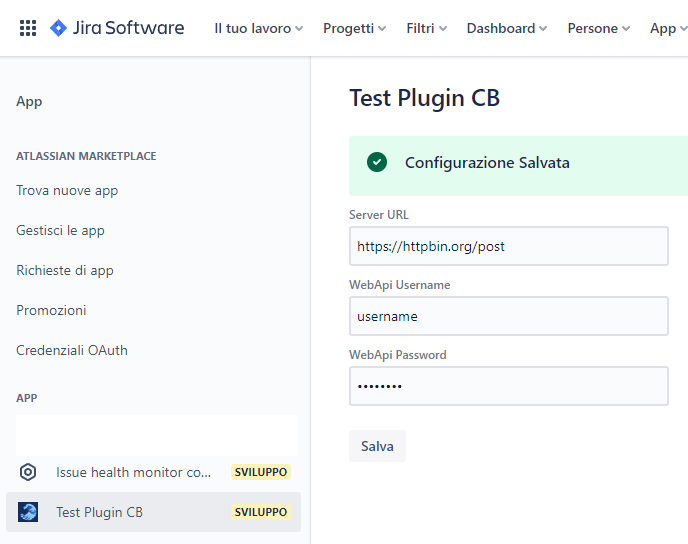
Creiamo subito una pagina per salvare le credenziali del server esterno, accessibile all’amministratore.
Ho seguito l’esempio ufficiale Issue Health, ecco il file js commentato
import ForgeUI, { render, AdminPage, Fragment, Form, useState, useEffect, SectionMessage, TextField } from '@forge/ui';
import { storage } from '@forge/api';

const App = () => {
    const STORAGE_KEY_PREFIX = "CB_CONFIGURATION_DATA";
    // inizializzo le variabili
    const [projectConfigState, setProjectConfigState] = useState(undefined);
    const [isConfigSubmitted, setConfigSubmitted] = useState(false);

    // questa funzione viene lanciata appena la pagina viene caricata, ed ogni volta che il valore del secondo parametro "cambia"
    // lo scopo è quello di caricare i dati salvati nel localStorage, se ci sono
    useEffect(async () => {
        const storageData = await storage.get(`${STORAGE_KEY_PREFIX}`);
        setProjectConfigState(storageData);
    }, [projectConfigState]);

    // sul submit della form, salviamo i dati nel localStorage del nostro plugin
    const onProjectConfigSubmit = async (serverConfig) => {
        await storage.set(`${STORAGE_KEY_PREFIX}`, serverConfig);
        setProjectConfigState(serverConfig);
        setConfigSubmitted(true);
    };

    // creazione grafica della form di inserimento e visualizzazione dati
    return (
        <Fragment>
            {isConfigSubmitted && <SectionMessage title="Configurazione Salvata" appearance="confirmation"/>}
            {<Form onSubmit={onProjectConfigSubmit} submitButtonText="Salva">
                <TextField label="Server URL" name="CB_CONF_SERVERURL" defaultValue={projectConfigState?.CB_CONF_SERVERURL} />
                <TextField label="WebApi Username" name="CB_CONF_USERNAME" defaultValue={projectConfigState?.CB_CONF_USERNAME} />
                <TextField label="WebApi Password" name="CB_CONF_PASSWORD" type='password' defaultValue={projectConfigState?.CB_CONF_PASSWORD} />
            </Form>}
        </Fragment>
    );
};

export const run = render(
    <AdminPage>
        <App />
    </AdminPage>
);
E dopo un forge deploy …
manifest.yml le scope permission, ___lanciamo forge lint --fix per assegnare i permessi in automatico.
package.json quindi uso npm install @forge/api, altrimenti sarebbe bastato npm install
Siccome abbiamo una nuova scope, oltre a lanciare forge deploy dobbiamo eseguire anche forge install --upgrade
Ecco il risultato!
Creazione Issue Panel con form personalizzato Link to heading
Ora vogliamo aggiungere un nuovo pannello per ogni attività, quindi andiamo a cercare nella lista dei componenti. Quello che fa al caso nostro è Issue Panel.
Innanzitutto aggiungiamo il nuovo modulo all’interno del manifest.yml, la mia sezione modules conterrà:
  jira:adminPage:
    - key: testplugincb-hello-world-admin-page
      function: main
      title: Test Plugin CB
      label: Descrizione del tuo plugin
      icon: https://iCloudio.github.io/images/imgOnda.png
  jira:issuePanel:
    - key: issue-panel
      function: panel
      title: Crea Rapportino CB
      label: Form Data CB
      icon: https://iCloudio.github.io/images/imgOnda.png
      description: Descrizione operazioni svolte dal plugin
  function:
    - key: main
      handler: index.run
    - key: panel
      handler: panel.run
Procedo poi a creare il file panel.js che contiene:
import ForgeUI, { render, Fragment, Text, IssuePanel, Table, Cell, useEffect, Form, SectionMessage, DatePicker, Select, Option, useState, Toggle, TextArea, useProductContext, Button, TextField, Row } from '@forge/ui';
import api, { storage, route } from "@forge/api";

const App = () => {
  const STORAGE_KEY_PREFIX = "CB_CONFIGURATION_DATA";
  // useState is a UI kit hook we use to manage the form data in local state
  const [formState, setFormState] = useState();
  const [jiraUser, setJiraUser] = useState();
  const [issueData, setIssueData] = useState();
  const [storageData] = useState(async () => await storage.get(`${STORAGE_KEY_PREFIX}`));
  const [trasfertaVisible, setTrasfertaVisible] = useState(false);
  const [errorString, setErrorString] = useState();
  const [successString, setSuccessString] = useState();
  const { platformContext: { issueKey }, accountId } = useProductContext(); // Get the context issue key

  const selectTipoIntervento = [
    { label: "Esterno", value: "esterno", defaultSelected: false },
    { label: "Interno", value: "interno", defaultSelected: true },
    { label: "Teleassistenza", value: "teleassistenza", defaultSelected: false }
  ];

  // On start i collect logged jira user data
  useEffect(async () => {
    const response = await api.asUser().requestJira(route`/rest/api/3/myself`);
    await checkResponse('Jira API', response);
    setJiraUser(await response.json()); // se setto solamente una variabile, essa non viene aggiornata in grafica
  }, []);

  // On start, i collect context data (issue name and description, project name)
  useEffect(async () => {
    const response = await api.asApp().requestJira(route`/rest/api/2/issue/${issueKey}`);
    await checkResponse('Jira API', response);
    setIssueData((await response.json()).fields);
  }, []); // se metti qualcosa nell array in dipendenza, appena questa cambia il suo valore, questa function viene rieseguita

  // Jira Plugin is published on AWS, i needed to know the public ip of published plugin
  useEffect(async () => {
    const translateRespons1e = await api.fetch("https://api.db-ip.com/v2/free/self",
      { method: 'GET'}
    );
    await checkResponse('TEST API', translateRespons1e);
  }, []);

  const showHideTrasferta = () => {
    setTrasfertaVisible(!trasfertaVisible);
  }

  // sulla submit del form, voglio creare anche un registro di lavoro Jira, e aggiorna il tracciamento temporale del progetto
  const createWorkLog = async (secondiWorkLog, dataInizio) => {
    var bodyData = `{"timeSpentSeconds": ${secondiWorkLog}, "started": "${dataInizio + "T03:00:00.000+0000"}"}`;
    const response = await api.asUser().requestJira(route`/rest/api/2/issue/${issueKey}/worklog`, {
      method: 'POST', headers: { 'Accept': 'application/json', 'Content-Type': 'application/json' }, body: bodyData
    });
    await checkResponse('CB API', response);
  }

  // Handles form submission, which is a good place to call APIs, or to set component state...
  const onSubmit = async (formData) => {
    // authenticazione e successivamente invio dati al nostro server
    const translateResponse = await api.fetch(storageData.CB_CONF_SERVERURL,
      { method: 'POST',  headers: {'Content-Type': 'application/json; charset=UTF-8'},
        body: JSON.stringify({
        "username": storageData.CB_CONF_USERNAME,
        "password": storageData.CB_CONF_PASSWORD,
      })
    });
    await checkResponse('CB API', translateResponse);

    setErrorString(undefined);
    setSuccessString(undefined);
    /** formData: { username: 'Username', products: ['jira'] }*/
    formData.CB_commessa = issueData?.project?.name.split('[').pop().split(']')[0];
    formData.CB_oggetto = "Rapportino d'intervento";
    formData.CB_user = jiraUser?.emailAddress;
    setFormState(formData); // aggiorno la variabile formData, con i dati inseriti dall utente nel form
    const secondiWorkLog = formData.CB_workTime * 60 * 60;
    createWorkLog(secondiWorkLog, formData.CB_executionDate);

    // post dati server... se ok:
    setSuccessString("Creazione rapportino eseguita.");
  };

  return (
    <Fragment>
      <Form onSubmit={onSubmit} onFinish={(values) => this.handleFormSubmit(values)} submitButtonText="Crea Rapportino">
            {<Table>
                <Row>
                  <Cell>
                    <DatePicker name="CB_executionDate" label="Data Intervento" defaultValue={new Date().toLocaleDateString('en-CA')} isRequired />
                  </Cell>
                  <Cell>
                    <TextArea name="CB_description" label="Descrizione attività" isRequired defaultValue={issueData?.description}/>
                  </Cell>
                </Row>
                <Row>
                  <Cell>
                    <TextField name="CB_workTime" label="Tempo Impiegato in ore" type="number" isRequired />
                  </Cell>
                  <Cell>
                    <Toggle name="CB_bpInAffiancamento" label="BP in affiancamento" />
                  </Cell>
                </Row>
                <Row>
                  <Cell>
                    <Select label="Tipo Intervento" name="CB_tipoIntervento" isRequired>
                      {selectTipoIntervento.map(el => <Option label={el.label} value={el.value} defaultSelected={el.defaultSelected}></Option>)}
                    </Select>
                  </Cell>

                  <Cell>
                    {  !trasfertaVisible ?
                      <Button onClick={showHideTrasferta} text='Aggiungi trasferta'></Button> :
                      <Button onClick={showHideTrasferta} text='Rimuovi trasferta'></Button>}
                  </Cell>
                </Row>
                <Row>
                  <Cell>
                  {  trasfertaVisible ?
                    <TextField name="CB_oreViaggio" label="Ore viaggio" type="number" isRequired />
                    : null}
                  </Cell>
                  <Cell>
                  {  trasfertaVisible ?
                    <TextField name="CB_kmtotali" label="KM andata e ritorno" placeholder='Km percorsi andata e ritorno' isRequired type='number' />
                    : null}
                  </Cell>
                </Row>
            </Table>
          }
      </Form>
      {
        successString && successString != "" ?
          <SectionMessage appearance='confirmation'>
            <Text>{successString}</Text>
          </SectionMessage>
          : null
      }
      {
        errorString && errorString != "" ?
          <SectionMessage appearance='error'>
            <Text>{errorString}</Text>
          </SectionMessage>
          : null
      }

    </Fragment>
  );
};

export const run = render(
  <IssuePanel>
    <App />
  </IssuePanel>
);

/**
 * Checks if a response was successful, and log and throw an error if not.
 * Also logs the response body if the DEBUG_LOGGING env variable is set.
 * @param apiName a human readable name for the API that returned the response object
 * @param response a response object returned from `api.fetch()`, `requestJira()`, or similar
 */
 async function checkResponse(apiName, response) {
  if (!response.ok) {
    const message = `Error from ${apiName}: ${response.status} ${await response.text()}`;
    console.error(JSON.stringify(response));
    throw new Error(message);
  } else if (true) {
    console.warn(`Response from ${apiName}: ${await response.text()}`);
  }
}
Con questo abbiamo concluso la nostra app, successivamente vedremo come pubblicarla sullo store ufficiale
Se hai trovato utile questo articolo, o se hai idee per il prossimo, contattami!
Link Utili Link to heading
-
Filosofo, scrittore e poeta francese, nonché uno degli autori più noti dell’illuminismo. Approfondisci ↩︎
