Judge a man by his questions rather than by his answers. — Voltaire1
Introduction. Link to heading
Jira Software allows teams to plan, assign, track, and manage work more easily.
Born in 2002 initially for bug and ticket monitoring only, it is written in Java, and the name is a truncation of Gojira, Japanese transliteration of Godzilla
In this article, we will create an application with the Forge development platform, for collecting and sending data to an external server, via a REST call.
Our plugin will contain:
- a configuration page with data from the external server
- functions that fetch the data from jira
- an additional data form sending data to the external server
The entire project can be downloaded from here
- There are various ways to install Jira apps on your environment.
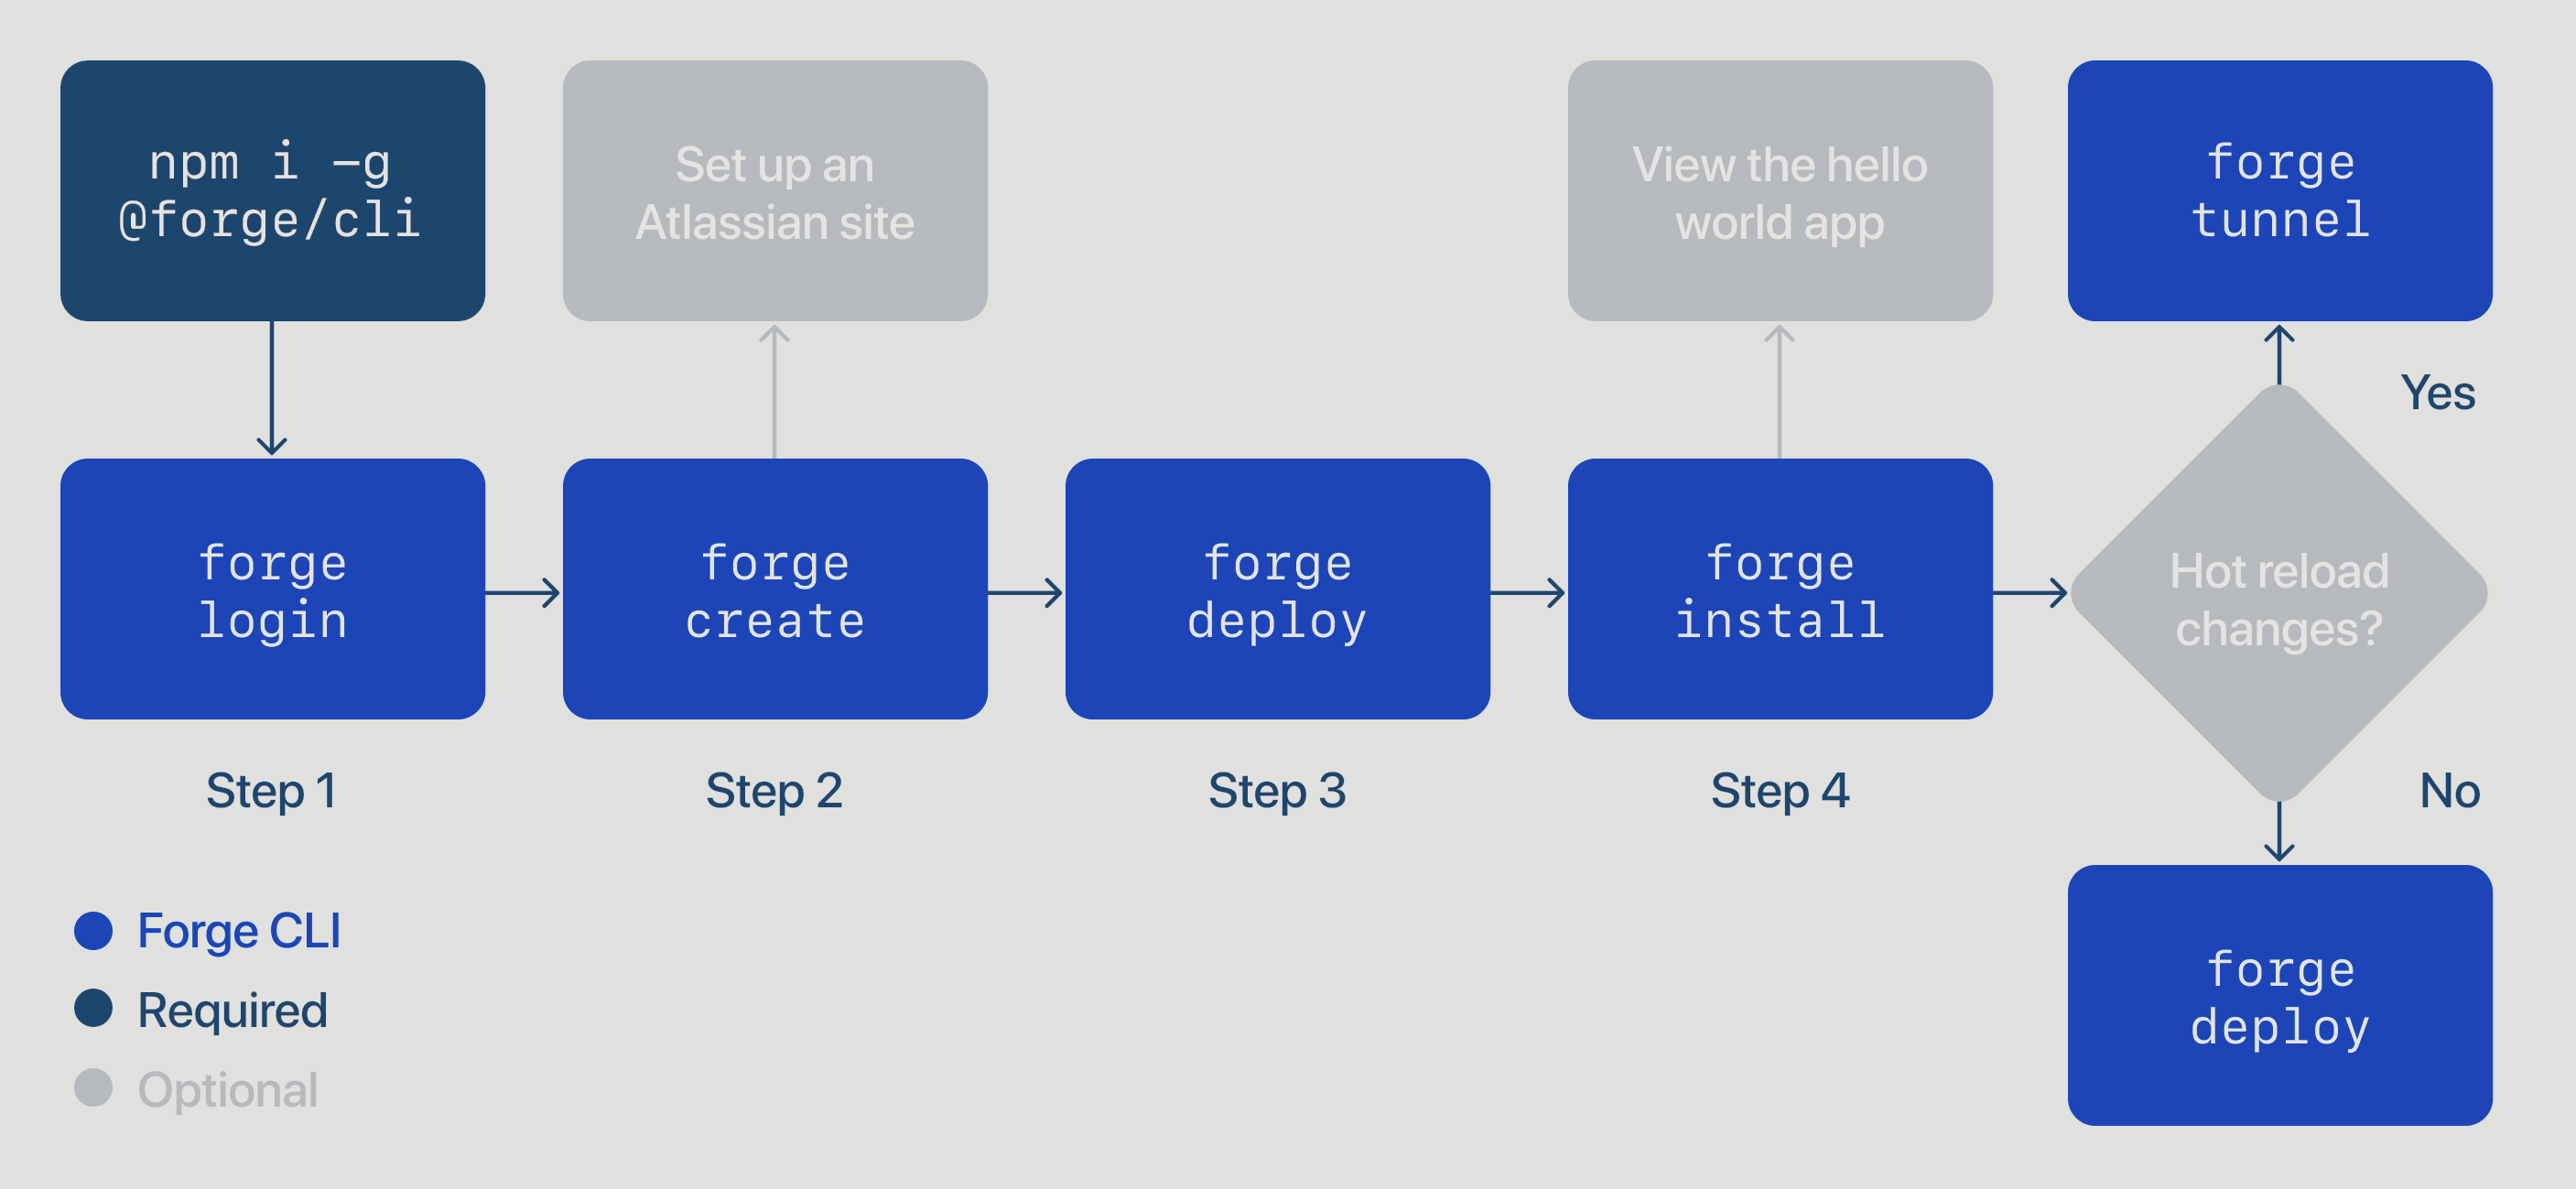
- If you prefer to download the code and publish the app from your environment use
npm installforge registerforge deploy
- You can monitor your apps and logs in the developer section, log in with your user, to find out which is which type
forge whoami- Jira app logs, will never be visible in the browser console.
App initialization Link to heading
- Install node and the cli of forge. GUIDE
- initializes the app. GUIDE
forge createwe choose the jira-admin-page-ui-kit template.- this choice is not binding, it is just the starting files structure
- we edit the manifest.yml file to update the app name and icon
modules:
  jira:adminPage:
    - key: testplugincb-hello-world-admin-page
      function: main
      title: Test Plugin CB
      label: Description of your plugin
      icon: https://iCloudio.github.io/images/imgOnda.png
- We install with
forge deployandforge installas described HERE - Let’s check the result, from the site, with the section “app” and then “manage app”
Configuration page Link to heading
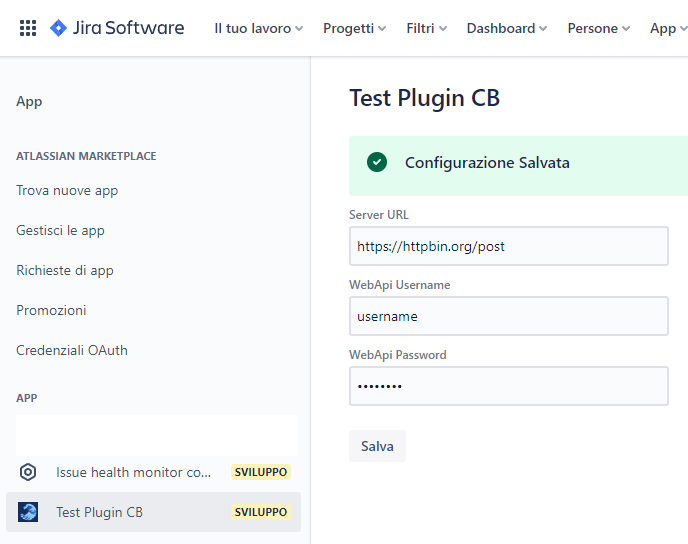
Let’s immediately create a page to save the credentials of the external server, accessible to the administrator.
I followed the official example Issue Health, here is the commented js file
import ForgeUI, { render, AdminPage, Fragment, Form, useState, useEffect, SectionMessage, TextField } from '@forge/ui';
import { storage } from '@forge/api';

const App = () => {
    const STORAGE_KEY_PREFIX = "CB_CONFIGURATION_DATA";
    // inizializzo le variabili
    const [projectConfigState, setProjectConfigState] = useState(undefined);
    const [isConfigSubmitted, setConfigSubmitted] = useState(false);

    // questa funzione viene lanciata appena la pagina viene caricata, ed ogni volta che il valore del secondo parametro "cambia"
    // lo scopo è quello di caricare i dati salvati nel localStorage, se ci sono
    useEffect(async () => {
        const storageData = await storage.get(`${STORAGE_KEY_PREFIX}`);
        setProjectConfigState(storageData);
    }, [projectConfigState]);

    // sul submit della form, salviamo i dati nel localStorage del nostro plugin
    const onProjectConfigSubmit = async (serverConfig) => {
        await storage.set(`${STORAGE_KEY_PREFIX}`, serverConfig);
        setProjectConfigState(serverConfig);
        setConfigSubmitted(true);
    };

    // creazione grafica della form di inserimento e visualizzazione dati
    return (
        <Fragment>
            {isConfigSubmitted && <SectionMessage title="Configurazione Salvata" appearance="confirmation"/>}
            {<Form onSubmit={onProjectConfigSubmit} submitButtonText="Salva">
                <TextField label="Server URL" name="CB_CONF_SERVERURL" defaultValue={projectConfigState?.CB_CONF_SERVERURL} />
                <TextField label="WebApi Username" name="CB_CONF_USERNAME" defaultValue={projectConfigState?.CB_CONF_USERNAME} />
                <TextField label="WebApi Password" name="CB_CONF_PASSWORD" type='password' defaultValue={projectConfigState?.CB_CONF_PASSWORD} />
            </Form>}
        </Fragment>
    );
};

export const run = render(
    <AdminPage>
        <App />
    </AdminPage>
);
And after a forge deploy …
manifest.yml the scope permissions, ___launch forge lint --fix to assign permissions automatically.
package.json so I use npm install @forge/api, otherwise npm install would have sufficed.
Since we have a new scope, in addition to running forge deploy we also need to run forge install --upgrade.
Here is the result!
Issue panel creation with custom form Link to heading
Now we want to add a new panel for each task, so let’s look in the list of components. The one that is right for us is Issue Panel.
First we add the new form inside the manifest.yml, my modules section will contain:
First we add the new module inside the manifest.yml, my modules section will contain:
  jira:adminPage:
    - key: testplugincb-hello-world-admin-page
      function: main
      title: Test Plugin CB
      label: description of your plugin
      icon: https://iCloudio.github.io/images/imgOnda.png
  jira:issuePanel:
    - key: issue-panel
      function: panel
      title: Create CB Report
      label: Form Data CB
      icon: https://iCloudio.github.io/images/imgOnda.png
      description: Description of operations performed by the plugin
  function:
    - key: main
      handler: index.run
    - key: panel
      handler: panel.run
I then proceed to create the panel.js file that contains:
import ForgeUI, { render, Fragment, Text, IssuePanel, Table, Cell, useEffect, Form, SectionMessage, DatePicker, Select, Option, useState, Toggle, TextArea, useProductContext, Button, TextField, Row } from '@forge/ui';
import api, { storage, route } from "@forge/api";

const App = () => {
  const STORAGE_KEY_PREFIX = "CB_CONFIGURATION_DATA";
  // useState is a UI kit hook we use to manage the form data in local state
  const [formState, setFormState] = useState();
  const [jiraUser, setJiraUser] = useState();
  const [issueData, setIssueData] = useState();
  const [storageData] = useState(async () => await storage.get(`${STORAGE_KEY_PREFIX}`));
  const [trasfertaVisible, setTrasfertaVisible] = useState(false);
  const [errorString, setErrorString] = useState();
  const [successString, setSuccessString] = useState();
  const { platformContext: { issueKey }, accountId } = useProductContext(); // Get the context issue key

  const selectTipoIntervento = [
    { label: "Esterno", value: "esterno", defaultSelected: false },
    { label: "Interno", value: "interno", defaultSelected: true },
    { label: "Teleassistenza", value: "teleassistenza", defaultSelected: false }
  ];

  // On start i collect logged jira user data
  useEffect(async () => {
    const response = await api.asUser().requestJira(route`/rest/api/3/myself`);
    await checkResponse('Jira API', response);
    setJiraUser(await response.json()); // se setto solamente una variabile, essa non viene aggiornata in grafica
  }, []);

  // On start, i collect context data (issue name and description, project name)
  useEffect(async () => {
    const response = await api.asApp().requestJira(route`/rest/api/2/issue/${issueKey}`);
    await checkResponse('Jira API', response);
    setIssueData((await response.json()).fields);
  }, []); // se metti qualcosa nell array in dipendenza, appena questa cambia il suo valore, questa function viene rieseguita

  // Jira Plugin is published on AWS, i needed to know the public ip of published plugin
  useEffect(async () => {
    const translateRespons1e = await api.fetch("https://api.db-ip.com/v2/free/self",
      { method: 'GET'}
    );
    await checkResponse('TEST API', translateRespons1e);
  }, []);

  const showHideTrasferta = () => {
    setTrasfertaVisible(!trasfertaVisible);
  }

  // sulla submit del form, voglio creare anche un registro di lavoro Jira, e aggiorna il tracciamento temporale del progetto
  const createWorkLog = async (secondiWorkLog, dataInizio) => {
    var bodyData = `{"timeSpentSeconds": ${secondiWorkLog}, "started": "${dataInizio + "T03:00:00.000+0000"}"}`;
    const response = await api.asUser().requestJira(route`/rest/api/2/issue/${issueKey}/worklog`, {
      method: 'POST', headers: { 'Accept': 'application/json', 'Content-Type': 'application/json' }, body: bodyData
    });
    await checkResponse('CB API', response);
  }

  // Handles form submission, which is a good place to call APIs, or to set component state...
  const onSubmit = async (formData) => {
    // authenticazione e successivamente invio dati al nostro server
    const translateResponse = await api.fetch(storageData.CB_CONF_SERVERURL,
      { method: 'POST',  headers: {'Content-Type': 'application/json; charset=UTF-8'},
        body: JSON.stringify({
        "username": storageData.CB_CONF_USERNAME,
        "password": storageData.CB_CONF_PASSWORD,
      })
    });
    await checkResponse('CB API', translateResponse);

    setErrorString(undefined);
    setSuccessString(undefined);
    /** formData: { username: 'Username', products: ['jira'] }*/
    formData.CB_commessa = issueData?.project?.name.split('[').pop().split(']')[0];
    formData.CB_oggetto = "Rapportino d'intervento";
    formData.CB_user = jiraUser?.emailAddress;
    setFormState(formData); // aggiorno la variabile formData, con i dati inseriti dall utente nel form
    const secondiWorkLog = formData.CB_workTime * 60 * 60;
    createWorkLog(secondiWorkLog, formData.CB_executionDate);

    // post dati server... se ok:
    setSuccessString("Creazione rapportino eseguita.");
  };

  return (
    <Fragment>
      <Form onSubmit={onSubmit} onFinish={(values) => this.handleFormSubmit(values)} submitButtonText="Crea Rapportino">
            {<Table>
                <Row>
                  <Cell>
                    <DatePicker name="CB_executionDate" label="Data Intervento" defaultValue={new Date().toLocaleDateString('en-CA')} isRequired />
                  </Cell>
                  <Cell>
                    <TextArea name="CB_description" label="Descrizione attività" isRequired defaultValue={issueData?.description}/>
                  </Cell>
                </Row>
                <Row>
                  <Cell>
                    <TextField name="CB_workTime" label="Tempo Impiegato in ore" type="number" isRequired />
                  </Cell>
                  <Cell>
                    <Toggle name="CB_bpInAffiancamento" label="BP in affiancamento" />
                  </Cell>
                </Row>
                <Row>
                  <Cell>
                    <Select label="Tipo Intervento" name="CB_tipoIntervento" isRequired>
                      {selectTipoIntervento.map(el => <Option label={el.label} value={el.value} defaultSelected={el.defaultSelected}></Option>)}
                    </Select>
                  </Cell>

                  <Cell>
                    {  !trasfertaVisible ?
                      <Button onClick={showHideTrasferta} text='Aggiungi trasferta'></Button> :
                      <Button onClick={showHideTrasferta} text='Rimuovi trasferta'></Button>}
                  </Cell>
                </Row>
                <Row>
                  <Cell>
                  {  trasfertaVisible ?
                    <TextField name="CB_oreViaggio" label="Ore viaggio" type="number" isRequired />
                    : null}
                  </Cell>
                  <Cell>
                  {  trasfertaVisible ?
                    <TextField name="CB_kmtotali" label="KM andata e ritorno" placeholder='Km percorsi andata e ritorno' isRequired type='number' />
                    : null}
                  </Cell>
                </Row>
            </Table>
          }
      </Form>
      {
        successString && successString != "" ?
          <SectionMessage appearance='confirmation'>
            <Text>{successString}</Text>
          </SectionMessage>
          : null
      }
      {
        errorString && errorString != "" ?
          <SectionMessage appearance='error'>
            <Text>{errorString}</Text>
          </SectionMessage>
          : null
      }

    </Fragment>
  );
};

export const run = render(
  <IssuePanel>
    <App />
  </IssuePanel>
);

/**
 * Checks if a response was successful, and log and throw an error if not.
 * Also logs the response body if the DEBUG_LOGGING env variable is set.
 * @param apiName a human readable name for the API that returned the response object
 * @param response a response object returned from `api.fetch()`, `requestJira()`, or similar
 */
 async function checkResponse(apiName, response) {
  if (!response.ok) {
    const message = `Error from ${apiName}: ${response.status} ${await response.text()}`;
    console.error(JSON.stringify(response));
    throw new Error(message);
  } else if (true) {
    console.warn(`Response from ${apiName}: ${await response.text()}`);
  }
}
With this we have concluded our app, next we will see how to publish it on the official store
If you found this article useful, or if you have ideas for the next one, please contact me!
